Deploying Nexodus Relay Nodes
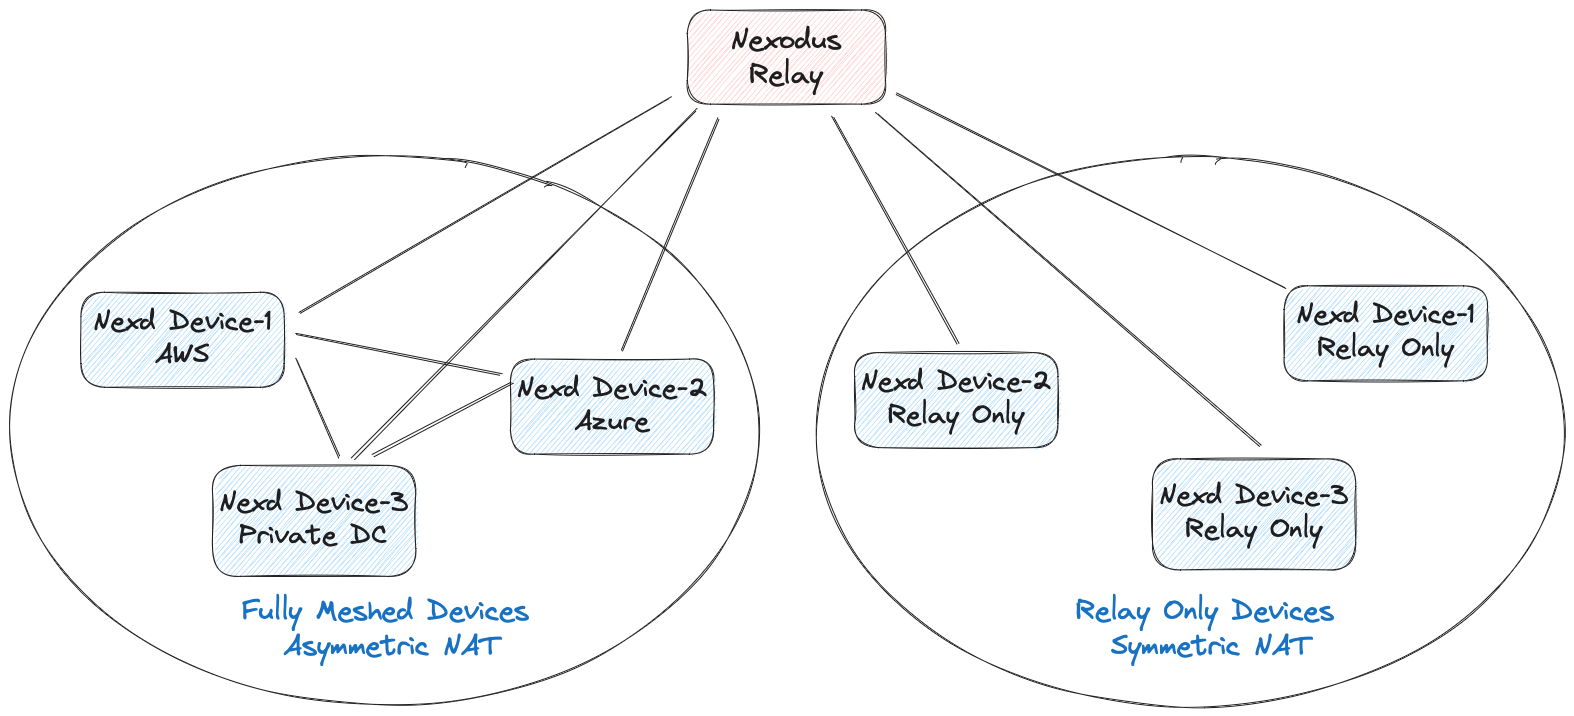
The Nexodus Service makes the best effort to establish direct peering between devices, but in some scenarios such as symmetric NAT, it's not possible to establish direct peering. To establish connectivity in those scenarios, the Nexodus Service uses a relay node to relay the traffic between the endpoints.
Currently Nexodus supports two types of relay:
- Wireguard based relay :
This relay node does not offer public, shared relay nodes. Instead, a relay node must be added to each VPC which requires them. Adding a relay node follows the same process as any other device but with additional options given to
nexd. This relays traffic using the wireguard tunnels, so the traffic gets decrypted and re-encrypted at the relay node. This relay node is hosted by a member of the organization and can be any device that can run the Nexodus Agent. - HTTPS based relay (DERP Relay) : This relay node is a public, shared relay node that is hosted by Nexodus at Nexodus DERP Relay. This relay node relays traffic using HTTPS/TLS, so the traffic is not decrypted at the relay node. This relay node is hosted by Nexodus and is available to all users. In scenarios where users don't want to use the public relay, the user can manually deploy this relay on their own infrastructure and onboard the relay similar to the wireguard relay node, but as a wireguard relay, it would be scoped to the specific VPC where it's on-boarded.
Given that both the relays can be on-boarded manually and relay the traffic, the reason we support wireguard-based relay is that it performs relatively better compared to HTTPS/TLS relay.
A relay node needs to be reachable from all the devices to ensure that devices can successfully connect (wireguard/udp, https/tcp) to the relay (and also on a predictable Wireguard port such as the default UDP port of 51820 for wireguard-based relay). They would most commonly be run on a public IP address, though it could be anywhere reachable by all devices in the VPC. There is only a need for one relay node in a VPC.
Given that Nexodus provides multiple options on how users can relay the traffic and they can switch between them, Nexodus uses a simple approach to select the relay node:
- If there is no on-boarded relay present in the VPC, Nexodus will use the public DERP relay.
- If the user on-boards a relay node (wireguard or DERP), It will switch to use the on-boarded relay.
- If the user removes the on-boarded relay node, it falls back to the public DERP relay node.
Note
Currently, Nexodus does not support multiple relay nodes in a VPC.
Please follow the instructions below on how to set up a specific relay.
Set Up Nexodus Wireguard Relay
Unlike normal peering, the Nexodus relay node needs to be reachable from all the nodes that want to peer with the relay node. The default port in the following command is 51820 but a custom port can be specified using the --listen-port flag. Follow the instructions in Deploying the Nexodus Agent instructions to set up the nexd binary.
To make the device a relay node, add the relay subcommand to the nexd command.
sudo nexd --service-url https://try.nexodus.127.0.0.1.nip.io relay
If you're using the Nexodus rpm package, edit /etc/sysconfig/nexodus to add the relay subcommand. If you're using the Nexodus deb package, edit /etc/default/nexodus to add the relay subcommand.
NEXD_ARGS="--service-url https://try.nexodus.io relay"
Set Up Self-hosted Nexodus DERP Relay
If the user would prefer to use its own relay instead of the public DERP relay, the user can deploy the relay node on their own infrastructure and on-board it to Nexodus. Peers behind symmetric NAT will switch to the self-hosted relay once it's successfully on-boarded. DERP relay uses TLS for communication, so the user will need to provide a TLS certificate and key to the relay node. Users can onboard the relay in the following two ways:
Using public DNS name
Users need to configure a DNS name (e.g., NameCheap, CloudFlare, etc.) resolving to the IP address of the machine running the relay node. The DNS name will be used to generate the TLS certificate (letsencrypt) for the relay node. Users can use the following command to onboard the relay node:
sudo nexd relayderp --hostname <relay domain name> --onboard
Using private DNS name
If users don't want to use a public DNS name, they can use a private DNS name (e.g., xyz.relay.io) to onboard the relay. However, this requires users to generate a TLS certificate and key for the relay node. Users can use the following commands to generate the TLS certificate and key (you need openssl to generate the key and certificate):
# Create CA’s root key
openssl genrsa -out rootCA.key 2048

# Create CA’s root certificate, that will be used to sign the server certificate
openssl req -x509 -new -nodes -key rootCA.key -sha256 -days 1024 -out rootCA.pem

# Create server key and certificate sign request
openssl req -new -newkey rsa:2048 -sha256 -nodes -keyout server.key -out server.csr
Create an extension file
# cat v3.ext
authorityKeyIdentifier=keyid,issuer
basicConstraints=CA:FALSE
keyUsage = digitalSignature, nonRepudiation, keyEncipherment, dataEncipherment
subjectAltName = DNS:<relay-private-domain-name>
Set subjectAltName to the private DNS name (e.g. DNS:xyz.relay.io) that user wants to use for the relay node.
Run the following command to sign and generate the server certificate
# Sign and create server certificate , do not use more than 825 days for certificate, otherwise Darwin OS will throw error
openssl x509 -req -in server.csr -CA rootCA.pem -CAkey rootCA.key -CAcreateserial -out server.crt -days 800 -sha256 -extfile v3.ext
The above command will generate rootCA key (rootCA.key) and certificate (rootCA.cet) files and server key (server.key) and certificate (server.crt) files. Rename the server key and certificate files to <relay-private-domain-name>.key and <relay-private-domain-name>.crt respectively.
cp server.key xyz.relay.io.key
cp server.crt xyz.relay.io.crt
Now you can use the private DNS name and the key/certificates to onboard the relay. Use the following command to onboard the relay node:
sudo nexd relayderp --hostname xyz.relay.io --addr ":443" --certmode manual --certdir "<certificate-directory-path>" --onboard
In this scenario, the user needs to install the root CA key (rootCA.key) to all the nodes that need to be connected through this onboard relay. Copy the file to each node and run the following command to install the root CA key:
CAROOT=</path/to/cert/dir> mkcert -install
Now you can onboard the device to Nexodus, and if the device is behind symmetric NAT, it will use the self-hosted relay and will use the root CA key to verify the TLS certificate of the relay node.