Quick Start
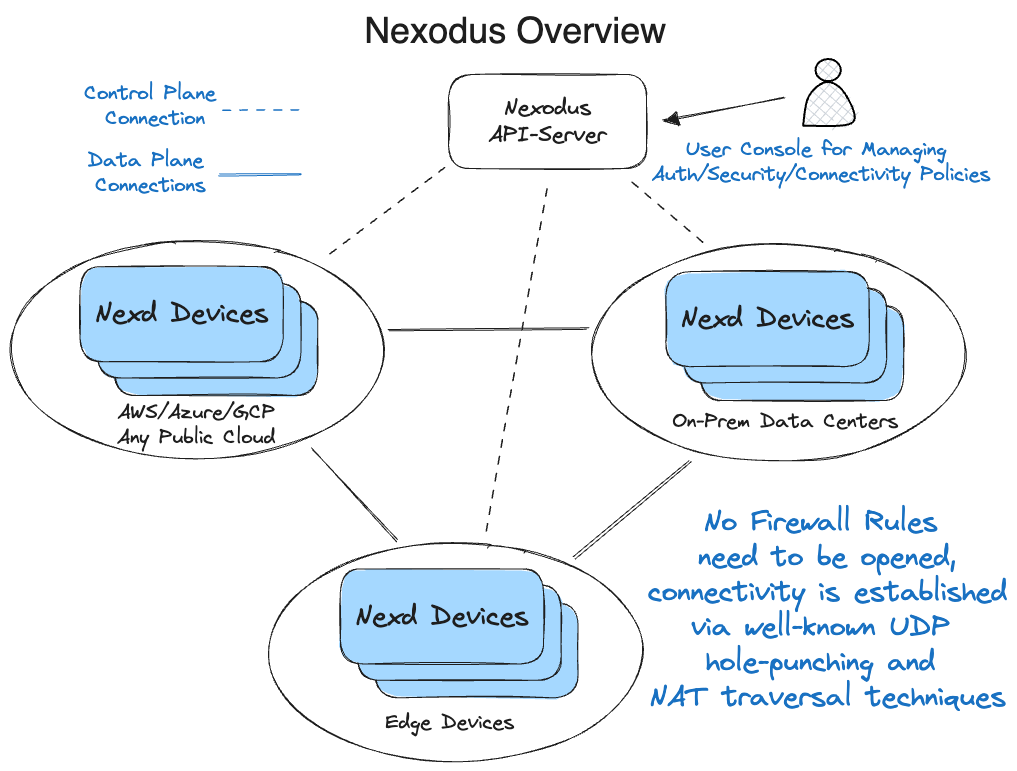
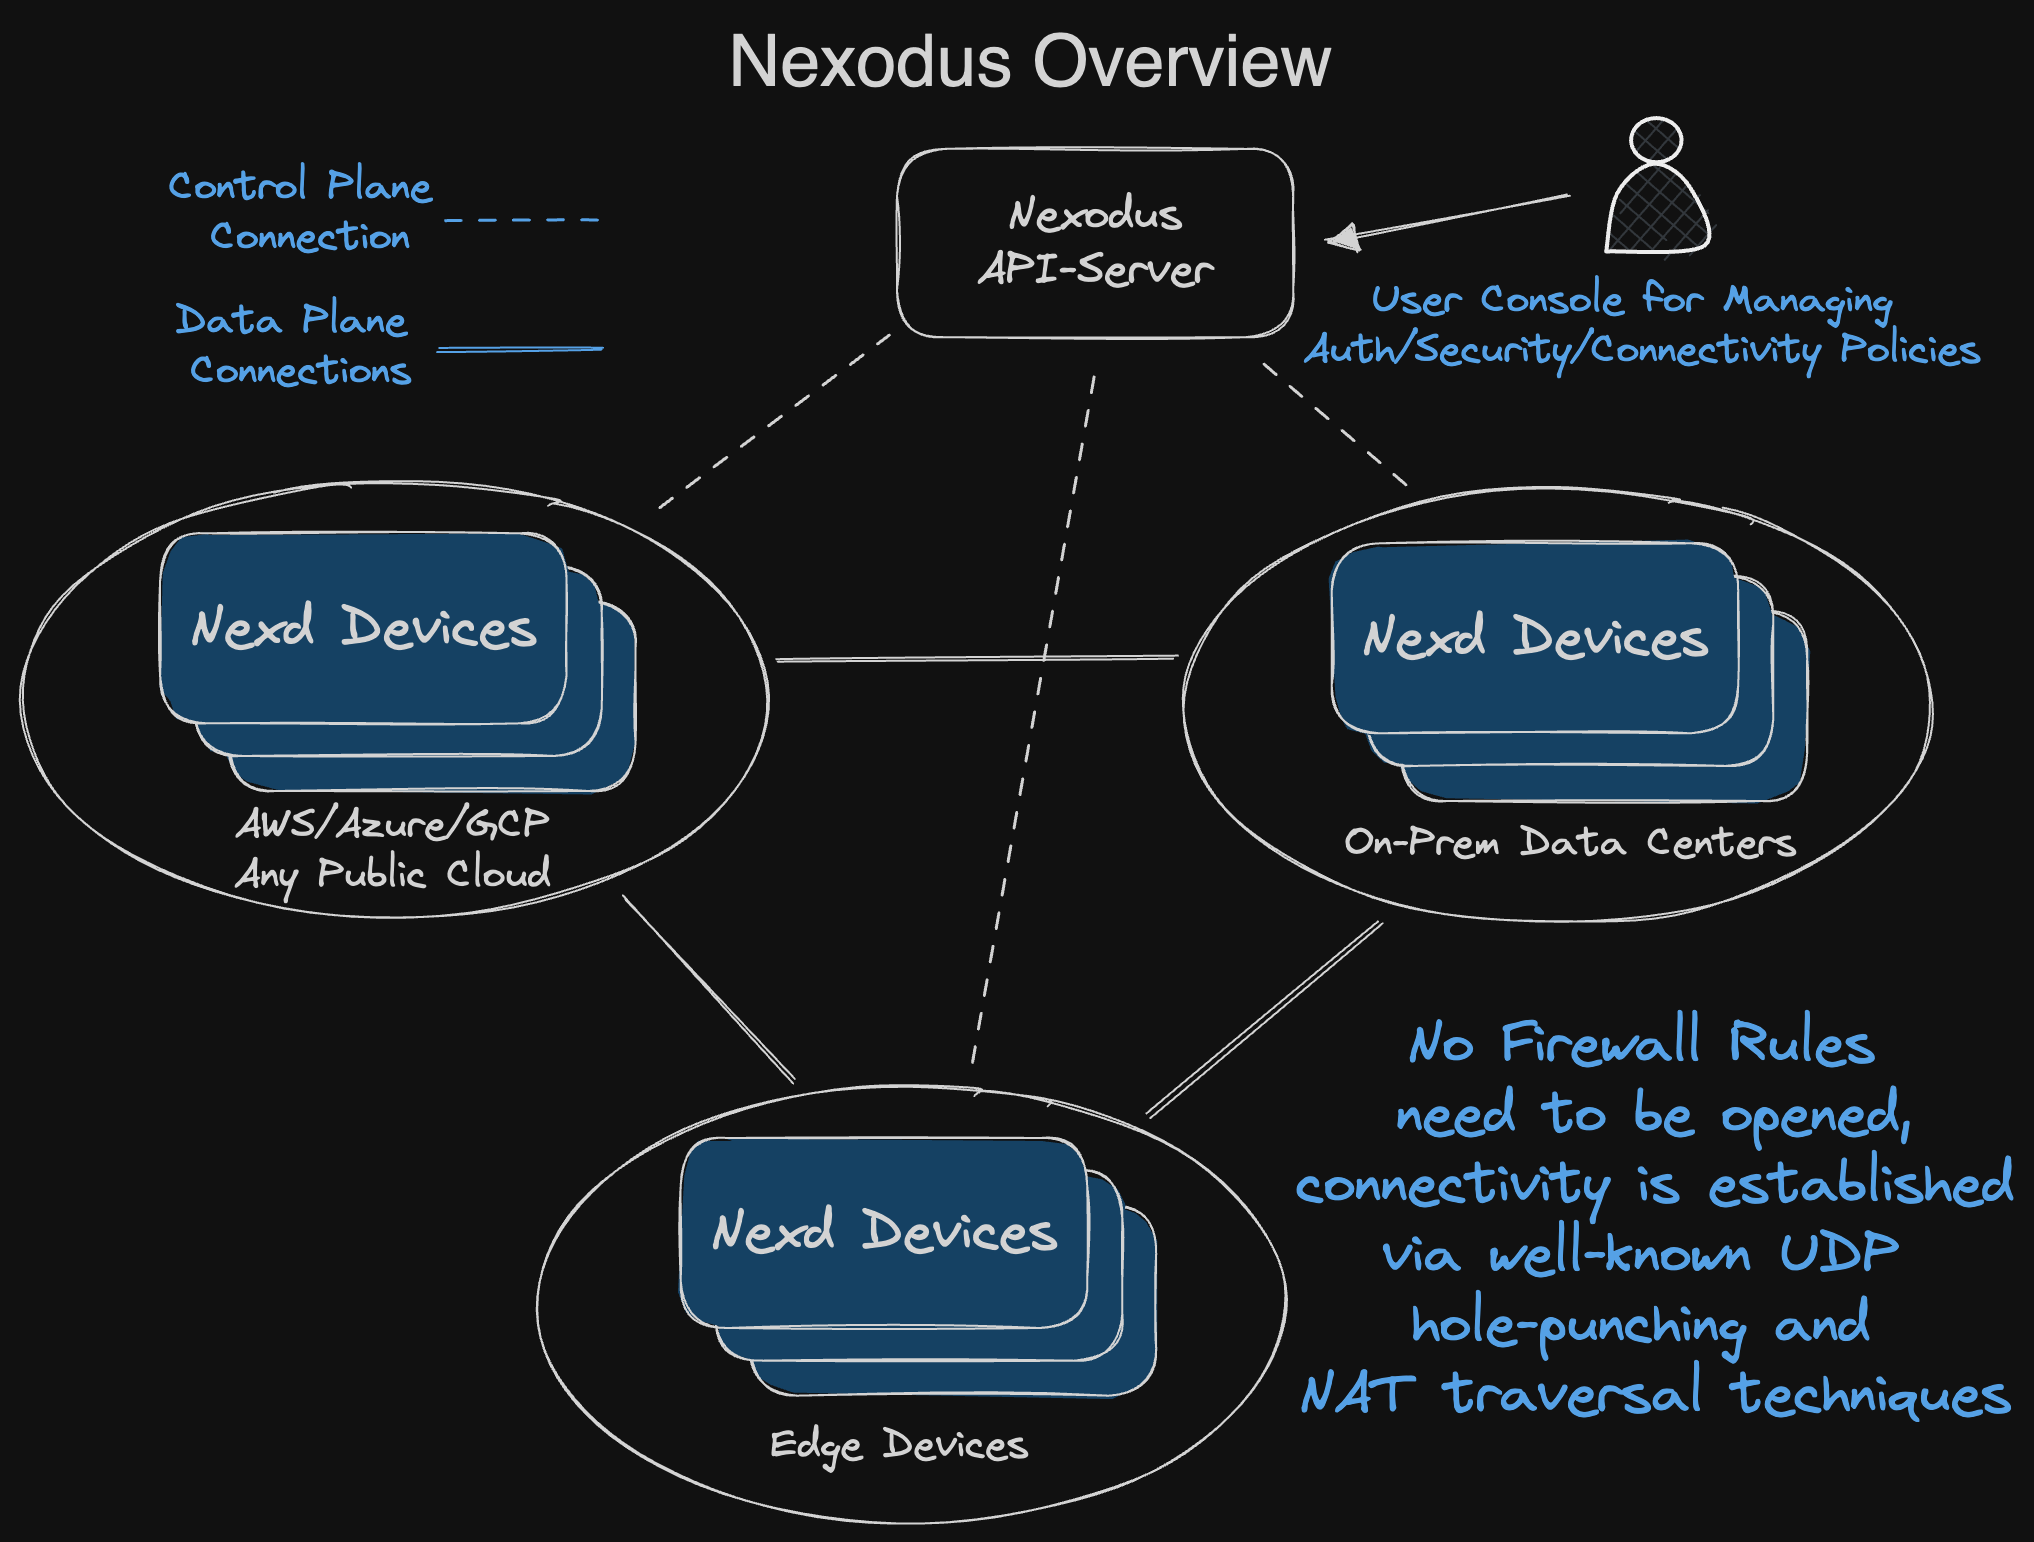
This guide will walk you through getting your first devices connected via Nexodus.
Install and Start the Nexodus Agent
Fedora, CentOS Stream
Supported versions:
- Fedora 38 (x86_64, aarch64)
- CentOS Stream 9 (x86_64, aarch64)
# Enable the COPR repository and install the nexodus package
sudo dnf copr enable nexodus/nexodus
sudo dnf install nexodus

# Start the nexodus service and set it to automatically start on boot
sudo systemctl start nexodus
sudo systemctl enable nexodus
Edit /etc/sysconfig/nexodus if you plan to use a Nexodus service other than https://try.nexodus.io.
Query the status of nexd and follow the instructions to register your device with sudo nexctl nexd status.
sudo nexctl nexd status
Brew
For Mac, you can install the Nexodus Agent via Homebrew.
brew tap nexodus-io/nexodus
brew install nexodus
To start the nexd agent and also have it start automatically on boot, run:
sudo brew services start nexodus
Query the status of nexd and follow the instructions to register your device with sudo nexctl nexd status.
sudo nexctl nexd status
Debian, Ubuntu Install with apt
To install the Nexodus binaries using apt package management, first add the Nexodus PPA repository and perform an apt-get update. The supported hardware architectures are AMD64 and ARM64.
sudo add-apt-repository ppa:nexodus/ppa
sudo apt update
Next, install the Nexodus package.
sudo apt-get install nexodus
Now you can either connect using the nexd command or start the Nexodus systemd service. To simply execute the installed binary run nexd and follow the authentication instructions.
$ nexd
Your device must be registered with Nexodus.
Your one-time code is: UWOJ-UEVS
Please open the following URL in your browser to sign in:
https://auth.try.nexodus.io/realms/nexodus/device?user_code=UWOJ-UEVS
Alternatively, to run Nexodus as a service, the necessary systemd service files are installed but not enabled. To enable and start the service, run the following.
sudo systemctl enable nexodus
sudo systemctl start nexodus
After starting the Nexodus service, you can run sudo nexctl nexd status to view the one-time code and URL to login. The login URL can also be viewed in the service logs with sudo journalctl -u nexodus -n 20. Once you log in for the first time, the token is cached in /var/lib/nexd/state.json. If you were to stop and start the Nexodus service, the nexd binary or restart the host, you would not need to re-authenticate unless the token expired.
sudo nexctl nexd status
Status: WaitingForAuth
Your device must be registered with Nexodus.
Your one-time code is: UWOJ-UEVS
Please open the following URL in your browser to sign in:
https://auth.try.nexodus.io/realms/nexodus/device?user_code=UWOJ-UEVS
To remove all binaries, service and files, stop the service and purge the package.
sudo systemctl stop nexodus
sudo apt-get purge nexodus
If you prefer, you can download the deb files from the Nexodus PPA repo and install using dpkg.
sudo dpkg -i ./nexodus_(version)_(arch).deb
Windows
There are various ways for Windows to start processes and services with Powershell and an eventual nexodus agent GUI, but for testing Nexodus on a Windows device, the following is a simple method.
- For Windows, you will need to install Wireguard from the official Windows Wireguard installer.
- Download the Windows x86-64 zip file containing the
nexd.exeandnexctl.exeexecutables. For simplicity, move those two files toC:\(or into a directory in your $PATH). - In the start menu, type
cmdand right-click onCommand PromptandRun as Administrator. Then, run the following in the command line and follow the URL to authenticate.
C:\Users\Administrator> cd C:\
C:\> nexd.exe
Your device must be registered with Nexodus.
Your one-time code is: LYNW-HKGO
Please open the following URL in your browser to sign in:
https://auth.try.nexodus.io/realms/nexodus/device?user_code=LYNW-HKGO
- You will now have an IP address on an interface named
wg0and be peered with other Nexodus devices in the VPC, which can be viewed by runningnexctl nexd peers listin another window.
Docker or Podman
For testing purposes, you can run the Nexodus Agent in a container. The following command will start a container and launch a shell inside it.
docker run --rm -it --cap-add SYS_MODULE --cap-add NET_ADMIN --cap-add NET_RAW \
    --sysctl net.ipv6.conf.all.disable_ipv6=0 quay.io/nexodus/nexd
Once the container is running, start nexd and follow the instructions to register your device.
nexd --service-url https://try.nexodus.io
Other
Download the latest release package for your OS and architecture. Each release includes a nexd binary and a nexctl binary.
Extract and install the binaries. For example, on Linux x86-64:
tar -xzf nexodus-linux-amd64.tar.gz
cd nexodus-linux-amd64
sudo install -m 755 nexd nexctl /usr/local/bin
Start nexd with sudo and follow the instructions to register your device.
sudo nexd --service-url https://try.nexodus.io
Test Connectivity
Once you have the agent installed and running, you can test connectivity between your devices. To determine the IP address assigned to each device, you can check the service web interface at https://try.nexodus.io, look the nexd logs, or get the IP using nexctl.
sudo nexctl nexd get tunnelip
sudo nexctl nexd get tunnelip --ipv6
Try ping or whatever other connectivity test you prefer.
ping 100.100.0.1
Alternatively, you can verify connectivity to the device's peers with the following.
sudo nexctl nexd peers ping